Monday, July 31, 2017

Sailing #1 - 7/28/17

Sailing!  This has been the single most difficult event to schedule.  Although there are a number of sailing clubs in the Dallas-Fort Worth area, we’ve had a hard time finding one that can fit us into their schedule, on our budget.  That match finally came up with Corinthian Sailing Club and youth coach Greta was happy to take on our challenge.

Olympic sailing has been around since 1896 and the types of craft used for the events has varied.  There have been 46 different classes used to date!  In the 2016 Rio games, there were four sailing events for the women, including the RS:X windsurfing that we’ve already completed.  The other three events are all in the “dinghy” class, which means small boats being sailed using five types of control: sails, foils (daggerboard, centerboard and rudder), trim (angle of the boat in the water), balance (controlled by weight of the crew) and route (factoring in wind, obstacles, tide, etc).  The boats are also all “monohull” design – one chassis, so to speak, as opposed to the catamaran style of the America’s Cup racing boats.  The events are the 470, the 49erFX and the Laser Radial. 

Our first meeting was mostly an introductory lesson to sailing.  We first sat down and went over terminology:  mast, boom, sail, jib, hull, centerboard, rudder, tiller, head, foot, luff, leech, roach, block, clew, tack, jibe, windward, leeward, reach, run…  I could go on and on.  We were on overload by the end of our lesson!  It was interesting to see how much education is required.  Even finding out how many parts there are on a sail was fascinating to me.
  
Learning the parts of the boat
Next, we headed over to take a look at a couple of the boats that we’d be using in future lessons so that Greta could point out the differences. 

Figuring out what lines move what parts of the sail
At the end of the lesson, we headed out on the water.  Greta chose to take us out on a Flying Scot – a larger boat all five of us could comfortably fit in to get a feel for the water and start taking turns manning the helm.  
The Flying Scot
While one person steered the boat, two of us manned the smaller jib sail, each pulling it and locking it into place on the correct side of the boat.  With the nice light wind we had on the lake, it was a nice trip close-hauling (sailing at an angle, into the wind) up the lake.  We quickly discovered that the “telltales” are the key to steering.  On each side of the main sail and jib, there are small streamers attached.  On the port side of the boat, the streamers are red.  On the starboard side, they are green.  The two colors are mounted at the same location, one slightly below the other, so that you can see both.  They should be flowing straight aft, if the boat is sailing properly.  If one, or both, are flopping around, it tells you how to trim the sail.  Small corrections to the tiller result in that smooth stream of air flowing over the sail.  There is also a “no-go” area like we had in windsurfing – where you allow the sail to line up perpendicular to the wind.  Although it’s noisy as the sail flaps in the breeze, it stops the boat quite quickly since no wind is being caught in the sail.

RA glances at the telltales while at the helm
Greta even showed us some of the more extreme ways to move weight about the craft, including leaning out over the edge of the boat, using foot straps to counterbalance.  This was a bit disconcerting for me – I didn’t like being on the lower side of the boat, my upper body immediately sitting forward as I felt like I would get dumped right out of the boat!

J holding a jib line - Coach was willing to lean a bit further out
What surprised me was when we turned to head back to the dock.  Greta mentioned that you can only sail as fast as the wind is blowing.  I figured we’d turn the sail, catch as much wind as possible and zoom back.  Instead, we leisurely floated back to the dock with the wind and current carrying us back, giving us time to ask more questions.


This was a fun first lesson.  Next time, we’ll start out on the Flying Scot once more, then move on to one of the Olympic style boats!

Monday, March 13, 2017

Steeplechase - 3/12/17


As an added bonus of working with Coach Buzz from Texas Express, after we were done with our high jump lesson, we were delighted to get the chance to try the steeplechase.  The most difficult part of that event has simply been locating a track with the right set-up.  Most high schools do not run the event and the college coaches I have contacted weren’t too motivated to help us out.  When Coach Buzz heard we still needed to complete that event, he offered us a chance.


The steeplechase is a 3000 meter (7 ½ lap) event and has been part of the men’s Olympic program since 1920.  It was added in 2008 for the women.  It gets its name from the similar horse racing event and originated in Ireland.  Horses and riders would race from town to town, using church steeples as guides since they could be seen from far away.  During the race, the horse would likely have had low stone walls and streams to jump over.  In the human version, the 3000m race consists of 28 barriers and 7 water jumps, which equates to 4 barriers and 1 water jump per lap.


The barriers are quite different than traditional hurdles.  First they are quite long so that multiple jumpers can go over them at once.  They cover approximately the first 3 lanes on the track.  They are also square – around 4”x4” – and covered by the same type of rubber material that most tracks are made of.  This shape and material aids in the jumps, as many racers step up onto the barrier, in stride, then jump off.  The women’s barriers stand 30” high.

 
Steeplechase barrier


The final barrier includes the water jump.  Immediately behind the barrier is a pit full of water.  Nearest the barrier, it is approximately 28” deep (we had no clue it was that deep!).  It is 12 feet long and at that farthest point from the barrier, is at track height.  The further out an athlete can jump from the barrier, the less water she’ll be landing in.  We saw some preliminary rounds of this event in Rio and there were a number of approaches by the women.  Some did jump the regular barriers completely.  Most chose to step on the water barrier to clear as much of the water as possible.  Others however, almost hopped over the barrier, landing in the deepest part of the water.


A few of us decided to run a lap, a couple of us decided to go ahead and give the water barrier a go.  Since it’s such a long drop, we opted to essentially sit on the barrier and jump from there.  Surely the shoes the athletes wear for this are highly specialized, as running with soggy tennies wasn’t easy!


J and R approach the water barrier

J setting up for her jump
Into the water
And continues her lap
We were happy to get the chance to learn a bit more about this event and have a chance to splash down in the water barrier.  Event #106 complete – only 5 more to go!!! 

High Jump - 3/12/17


We returned to Lovejoy High School to work with Coach Buzz Andrews of Texas Express Track Club on high jump.  There were some similarities to last week’s pole vault lesson, but definite differences as well.


After a warm-up jog and some stretches, we talked a bit about the approach to high jumping.  When the high jump was first competed, there were no cushy foam mats, usually sand, so the jumpers mainly landed on their feet.  As the sport progressed, and mats were added, jumpers moved more to a “roll” style jump where they faced the bar and rotated the length of their body parallel to it.  In 1968, Dick Fosbury won a gold medal at the Mexico City Olympic games and brought his style, what became known as the “Fosbury Flop” into the spotlight.  To this day, nearly all jumpers use this technique that has them bending backwards over the bar.


The general concept is a sprint run-up, straight toward the bar, but off to one side.  The final few steps are then taken in a curve, becoming parallel with the bar.  The shape that is defined by this run is a “J”.  As the jumper approaches the bar and begins the turn, the body will lean away from the bar, due to centripetal force pulling the body inward toward the center of the circle shape they are running.  When the jumper lifts the knee and arms to begin their jump, the force is released and the body can then bend and get over the bar.


We started off like last week by running the “J” backwards, from the mat.  That defined our starting marks.  Then we did a few runs without jumping, to ensure our bodies were leaning away properly.

J shows the proper lean away from the bar
Then we did some initial jumps onto the mat with no bar.  A couple of us really struggled with either trying to jump off of the wrong foot, or trying to hop off of both feet.  In order to complete a successful jump, you must jump off of one foot and the bar must remain on the stand (touching it is okay, as long as it doesn’t fall).  Personally, my body just didn’t want to make the backward bend – I looked more like a doll with no bendable limbs falling back into the mat!  As some of us got the feel for it, we worked over the bungee “bar” to a height of around 3-4 feet.  The other two of us did really get the hang of a more sideways motion over the bungee and even managed to fully clear it once or twice.

 
R shows great form at takeoff with arms up and knee high

L1 cleared the highest bar
Even with our mixed success, we were all glad we had the opportunity to try this event, especially with the assistance of a great coach.  Thanks again, Buzz!  High Jump (event #105) complete!


Tuesday, March 7, 2017

Pole Vault - 3/5/17

We're BACK!  After a much needed break and time for one of our Olympians to heal from a nagging foot issue, we are ready to finish off this journey.  Only 8 events left to conquer!!!


We spent a rainy Sunday morning at a beautiful indoor facility with two great coaches for our pole vaulting lesson.  Buzz Andrews and his son, Chad – of TexasExpress Track Club – are elite level coaches.  They have worked with many youth and adult athletes over the years, so we’re lucky to have convinced them to give us a shot.


We started out with a good warm up jog and stretch, then went right into the proper way to grip a pole.  First, we held the 11 foot pole next to us and reached up as high as we could, standing on our tip-toes.  That located our dominate hand placement.  Then, gripping with that hand, we bent our elbows tightly.  Our non-dominate hand would be placed two finger-widths from where the tip of our elbow landed. 

Coach Chad explaining hand positioning
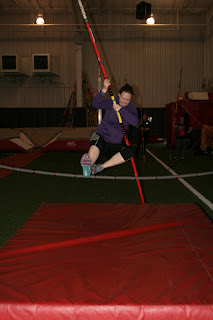
Then we talked about the proper form for holding the pole when running.  The top, dominate hand, should be down by the hip, palm open and facing forward, loosely supporting the pole.  The lower, non-dominate hand should be up, holding the pole somewhat loosely again, with the tip pointing across the body.  A relaxed, almost bouncy gait is used when starting run up to the vault.  We practiced running on the turf slowly at first, then faster.  Then we worked on footing and planted the pole to do tiny swings, taking off and landing on the same foot.  All the while, we were reminded that we should always hold on to the pole – neither hand should ever come off.  (Reminded us of rowing – “never let go of the oar!”)  Next, we went over to a crash pad where the coaches measured our steps away from the pad to mark the turf with our individual starting points.  We would be doing a “3 step” approach – which is actually 6 steps (they only count the left foot strikes).  We started with the same small swings, landing on our feet, but on the crash pad.  Then we went on to swinging our legs up and landing on our rear ends.  This was really the first hesitation point, but L2 went first and convinced everyone if she could do it, so could they. 

L2's first "rear" landing
Once we cleared that ~12” pad, we added another.  Then the coaches eventually added a bungee another foot or so above that.  Due to the padding around the real vault box (the metal, in-ground location where the tip of the pole would be set for going over a real bar) being even higher than that, the coaches decided it wouldn’t be safe for us to try actually using that area.  But clearing around 36” was good enough for us!  We all managed to get over that height at least once.  R was the best at getting her feet up in the air – and actually bent the pole!

Coach Buzz and Coach Chad hold the bungee while R attempts a vault
L1 probably had the most impressive form jump of the day, but it was J who dominated.  The coaches were even trying to convince her to continue with lessons to possibly get into Master’s (or “old people”) level competition.  She was determined to go higher and higher – actually jumping the highest of all of us, requiring a slightly longer run up and higher grip.

J concentrates on clearing the bungee
Overall, we were all impressed that we actually managed to complete this event.  No one actually jumped in the usual upside down form, but clearing three feet or so was definitely a WIN!


We’ll be back with the same coaches next week for another event, or possibly two…  Pole vault COMPLETE!!!

Though we didn't use the real vault box, it makes for an impressive photo